Home » Blogspot
Showing posts with label Blogspot. Show all posts

October 26, 2020

How to Increase / Decrease font size in blogger Posts

If you want to change, Sometimes you need to Increase or Decrease font size in blogger posts in order to user experience. Follow the following steps.

1. Go to your www.blogger.com 

2. Select your blog in which you want to fix a value for the name field is required 

October 25, 2020

How to Show widget only on homepage in blogger

1. Go to your www.blogger.com 

2. Select your blog in which you want to fix a value for the name field is required 

Add jQuery Lazy Load in Blogger to Boost Your Blog Speeed


Follow these steps to increase your Blogger Website Speedup with Image Lazy Loading Script


Yow Can see the instant effect after implementing this jQuery Code in Your Template.

1. Go to your www.blogger.com 

2. Select your blog in which you want to fix a value for the name field is required 

Guide to Add Related Posts Widget with Thumbnails to Blogger

1. Go to your www.blogger.com 

2. Select your blog in which you want to fix a value for the name field is required 

October 22, 2020

[Fixed] A value for the name field is required in Blogger

if you are getting an error  "A value for the name field is required" in Blogger, you can Fix here A value for the name field is required in Blogger easily by following steps.


1. Go to your www.blogger.com 

2. Select your blog in which you want to fix a value for the name field is required 

Steps to add Author Box Below Each Post in Blogger [Blogspot]

1. Go to your www.blogger.com 

2. Select your blog in which you want to  add Author Box Below Each Post
3. Click on Theme from Left Menu.
4. Click on Arrow my theme like bellow.


October 05, 2020

How to Add Fixed Responsive Floating AdSense Box In Your Blog Footer [Blogger]

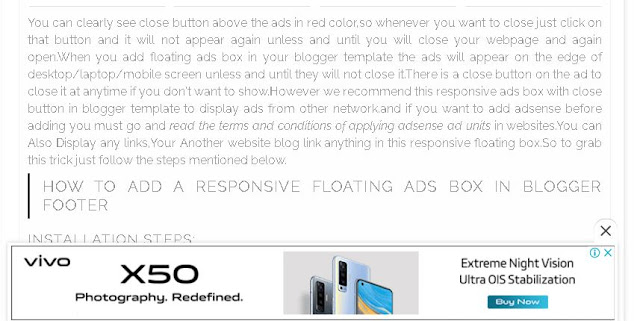
Fixed Responsive Floating AdSense Box In Your Footer

These are the Steps by which you can use and  Add  Fixed Responsive Floating AdSense Box In your blogger footer Area.


1. Go to your www.blogger.com 
2. Select your blog in which you want to Open all Internal or External Links in New Tab
3. Click on Theme from Left Menu.
4. Click on Backup/Restore your template before doing any Changes.
5. Click on three dots (...) near my theme.
6. Click Any Where on the Code And Press (Ctrl + F) to find </head> tag in HTML.
7. Above the </head> paste the following CSS code.

August 20, 2020

How to display Legal Sticky Footer, Left & Right AdSense Ads in Blogger?

display Legal Sticky Footer, Left & Right AdSense Ads in Blogger


Hello Every One , Welcome to My Blog www.MohammadSuhail.Com

Having a google Adsense Account may be a typical task for you nowadays. But making money through google adsense may be more than it . If you are having google adsense Adsense account , you are lucky one. 

Many of them is complaining that they not making good amount of money in spite of applying Adsense ads in their Websites / Blog . 

In this post i will give you the best method by which you can make a decent money by applying the java script  widget code in your blog.

This code is legal. There will not be create any issue after using this code. These are the blog code in which you can insert your adsense ads code. You only have to put the code in blogger template layout area. The adsense ads will automatically display in thees blog codes. 

July 15, 2020

[Blogger] Way to Open all Internal or External Links in New Tab

Below are the Quick Steps to open all Internal or External Links in New Tab

1. Go to your www.blogger.com 
2. Select your blog in which you want to Open all Internal or External Links in New Tab
3. Click on Theme from Left Menu
4. Click on Backup/Restore your template before doing any Changes.
5. Click on “Edit HTML”
6. Click Any Where on the Code And Press (Ctrl + F) to find <head> tag in HTML.
7. Below the <head> paste the following code
    <base target='_blank'/>
8. Save your Template, 

Now you have Successfully applied the code to Open all Internal or External Links in New Tab in Blogger.

June 03, 2020

[FeedBurner Fix] "The feed does not have subscriptions by email enabled"


If you get the FeedBurner error message like this, this means that you need to enable the subscription by email option from your FeedBurner account settings.

May 25, 2020

[Fixed] Blogger Favicon not Updating | Blogger Favicon Not Working


[Fixed] Blogger Favicon not Updating 

Favicon is a small icon file show in tab bar of the respective blog near your title.

You can upload your own Favicon image from the Layout tab in your Blogger Dashboard.

Uploading your Favicon

To upload your own Favicon image

Step 1. Go to Blogger www.blogger.com

Step 2. Select the blog in which you want to upload your own Favicon image

Step3. Go to ➟ Layout ➟ Click on Edit Option near Favicon.

Now Upload custom favicon

Note : Select a favicon file. Please use a square image that's less than 100 KB.

You Can Check you icon by following web address

http://[yourblog].blogspot.com/favicon.ico (Replace the blog name in the URL)


Easy Way to Remove Read More or Jump Break Link in Blogger

Hello Blogger Blogspot Guys, Do you not like Read More.. option in your blogger blogspot blog.   You are trying and want to remove Remove Read More... or Jump Break Link from your Blogspot . It is very easy to do so.

you might  face a problem while directly remove the read more link in default Blogger templates. Actually it does not remove after removing code. So In order to apply the style effects to such templates you need to remove the read more link provided by blogger Blogspot code.You can do it in few seconds. In this topic I will tell  you how to Remove Read More or Jump Break Link in Blogger Blogspot.

May 07, 2020

5 Simple Steps To Add Blogger Custom Domain With GoDaddy in 2020-21

First Go to www.blogger.com

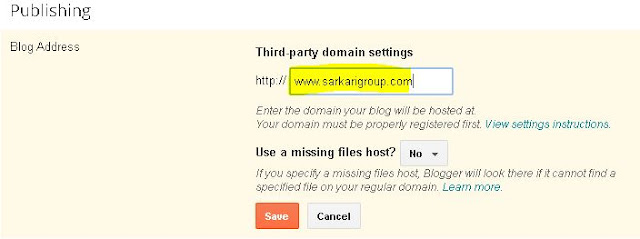
Login into your Blogger Account ⇢ Go to your blog  Settings  Click on "Basic Visit "Publishing" Section 


Now Click on Set up a third-party URL for your blog    and type 'www.YourdomainName.Com' (you must use 'www' with your Domain Name)  ⇢ Click on Save Button


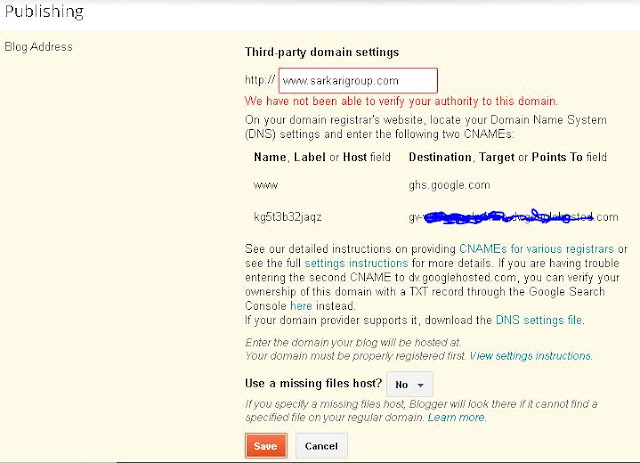
When you click on Save Button , you will get following Error

"We have not been able to verify your authority to this domain.


Add 'CNAME' records in GoDaddy

To add 'CNAME' records in GoDaddy , Login into your Godaddy account  click on 'Domains'  click 'All domains'  choose your domain  click on 'Manage' 


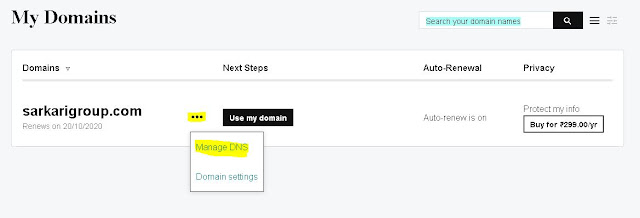
At the bottom side of the page  you will see the option for managing the DNS  Click on "Manage DNS"


Then the "Records" table will be popped out on the next page (Shown below). If there is already 'www' name is available then you need to edit it or if not, then you need to add a new record.


Click on "ADD"  In "Type" choose "CNAME"  in "Host" type "www"  and in "Points to" field type "ghs.google.com" as shown below;


Click on "ADD"  In "Type" choose "CNAME"  in "Host" type Second CNAME record  and in "Points to" field type the respective address. As shown below;


3. Setup 'A' zone records in GoDaddy.


Now its time to update the A zone records; i.e. IP addresses provided by the BlogSpot server. The process is the same as that of shown in the above steps; let's do it.


Here you need to add 4 IP addresses which are common for all the blogger users at the same record table shown above.


Click on "ADD"  In "Type" choose "A"  in "Host" type "@"  and in "Points to" field type "216.239.32.21" As shown below;


Again as same as above, including all add following 4 address;

216.239.32.21

216.239.34.21

216.239.36.21

216.239.38.21


This is how you can set the domain IP addresses that now pointing to your Blogger server addresses. The final CNAME & A record table will be like this;


4. Publish your Blogspot blog.


Once you completed all the above 3 steps, then its time to save all the settings and publish the blog.


Again go to the your blogger dashboard  Settings  Basic  "Publishing" section  check and SAVE it.


Make sure you check the option to redirect your "domainname.com" to "www.domainname.com"


The DNS settings which you made here (A & CNAME records) might take some time to generate. Now you required to wait for 1 to 4 hours for this changes to take effect globally.


Keep checking your custom domain should automatically redirect from the blogspot.com URL to your new custom domain name address.


That’s all for now; your BlogSpot blog address is has been set up with a custom domain name. Do let me know if you have any doubt in configuring a domain for your blog. In case you need some help, feel free to let me know via comment section shown below.


December 23, 2019

Follow just 7 Steps to add SubDomain in blogger with Godaddy

1. Fisrt you have to loging on your godaddy account.


December 14, 2019

How to Add Breadcrumbs Navigation in Blogger

1. Go to Blogger >>Theme >> Edit HTML

2. Click anywhere in the HTML codes and Press Ctrl+F   

3. Now search for <div class='blog-posts hfeed'> code line

4. Paste below codes just after the <div class='blog-posts hfeed'> code line

<b:if cond='data:blog.homepageUrl != data:blog.url'><div class='bcm'>

<div style='display: inline;' typeof='BreadcrumbList' vocab='http://schema.org/'>

<div itemprop='itemListElement' itemscope='' itemtype='http://schema.org/ListItem' style='display: inline;'><a href='/' id='buttonboxback' itemprop='item' itemscope='' itemtype='http://schema.org/Thing'><span itemprop='name'>Home</span></a>

<meta content='1' itemprop='position'/></div><b:if cond='data:blog.pageType == &quot;item&quot;'><b:loop values='data:posts' var='post'><b:if cond='data:post.labels'><b:loop values='data:post.labels' var='label'><b:if cond='data:label.isLast == &quot;true&quot;'><div itemprop='itemListElement' itemscope='' itemtype='http://schema.org/ListItem' style='display: inline;'><a expr:href='data:label.url' id='buttonboxback' itemprop='item' itemscope='' itemtype='http://schema.org/Thing'><span itemprop='name'><data:label.name/></span></a> <meta content='2' itemprop='position'/></div></b:if></b:loop></b:if></b:loop></b:if><div itemprop='itemListElement' itemscope='' itemtype='http://schema.org/ListItem' style='display: inline;'><a expr:href='data:blog.url' itemprop='item' itemscope='' itemtype='http://schema.org/Thing'/><span id='buttonboxback1' itemprop='name'>&#160;&#160;<data:blog.pageName/></span> <meta content='3' itemprop='position'/></div></div></div><br/></b:if>
5. Search for ]]></b:skin> and paste below CSS codes just before ]]></b:skin>


#buttonboxback {display:inline;background-color: #1E90FF; padding:5px;padding-left:8px;width:120px;height: 30px;position: relative;border-radius: 5px;text-align: center;color: #fff;font: bold 14px/30px Sans-Serif;text-decoration: none;}#buttonboxback:hover {background-color: #0081ff;}#buttonboxback:after {z-index:1;content: "";position: absolute;top: 0;right: -11px;border-style: solid;border-width: 13px 13px 13px 0px;border-color: transparent #1E90FF transparent transparent  ; transform: rotate(-180deg);}#buttonboxback:hover:after {border-right-color:#0081ff;}#buttonboxback1 {display:inline;background-color: #fff; padding:5px;width:120px;height: 30px;position: relative;border-radius: 5px;text-align: center;color: #000;font: normal 14px/30px Sans-Serif;text-decoration: none;}


6. Click to save theme. Now You have successfully Added Breadcrumb Navigation in blogger

7. Now remove status message in your blogspot Template


8. Search for the following code inside HTML template

<b:includable id='status-message'>
Click the highlighted Arrow


You will find Code like Below


Remove the Below code

<b:includable id='status-message'>
      <b:if cond='data:navMessage'>
      <div class='status-msg-wrap'>
        <div class='status-msg-body'>
          <data:navMessage/>
        </div>
        <div class='status-msg-border'>
          <div class='status-msg-bg'>
            <div class='status-msg-hidden'><data:navMessage/></div>
          </div>
        </div>
      </div>
      <div style='clear: both;'/>
      </b:if>
    </b:includable>
Now Replace the above Code with below code

<b:includable id='status-message'>
<b:if cond='data:navMessage'>
<div>
</div>
<div style='clear: both;'/>
</b:if>
</b:includable>
Now Click to Save the theme.

October 28, 2019

How To Add Each Blogger Post in Separate Boxes

To Add Each Blogger Post in Separate Boxex , you can do it very easily. You will have to perform following steps  and by doing these steps each blog post will show up in seprate box on homepage of your blog.

1. Go to Blogger  >> Theme  >> Edit HTML

2. Click anywhere in the HTML codes and Press Ctrl+F

3. Now search for ]]> </b:skin> code line

4. Add the following code above the ]]> </b:skin>

.post {
background:#FFFFFF;
border: 1px solid #000000;
padding-right:7px;
padding-left:7px;
padding-top:7px;
padding-bottom:7px;}
.post:hover {
border: 1px solid #FF0000;
}
.post:active {
border: 1px solid #0004FF;
}

Remove Links from Header and Post Title in Blogger

Follow These Steps To Remove Header Link

1. Go to Blogger >>Theme >> Edit HTML

2. Click anywhere in the HTML codes and Press Ctrl+F   

3. Now search for below  code of lines

Change Post Title Font, Size and Color in Blogger

1. First Login in your blogger Account & Select Your Blog.
2. Go to Blogger  >> Theme  >> Edit HTML
3. Remove Code Like Below......

.post-title, .post h3{
Code of Lines....
...........................
}
.post h3 a, .post h3 a:visited, .post h3 strong {
Code of Lines.....
...........................
}
.post h3 strong, .post h3 a:hover {
Code of Lines.....
...........................
}

October 27, 2019

Top 18 Secrets to boost your Blogger blog speed Super Fast


Follow These Top 18 Secret Steps to boost your Blogger blog speed Super Fast

1. Remove default Widgets, JavaScript from Blogger

2. Remove the unwanted default CSS files

(a) Search For the tags:
<b:skin><![CDATA[
Code of Lines...........
...................................
]]></b:skin>

(b). Now Cut All your CSS codes' and paste that code inside Style Like below

<style type='text/css'>
Code of Lines...........
...................................
</style>

(c). And now place that code in your template as:
<b:skin><![CDATA[
]]></b:skin>

<style type='text/css'>
Code of Lines...........
...................................
</style>

May 08, 2017

Search Preference Setting in blogger

Enable Search Preference Setting:

Steps to enable search preference setting in your blogger account.

1. Go at blogger.com and Log in your blogger acccount.

2. Select Blog a blog in which you want to enable your search preference setting. 

3. Now Click on Setting > Search Preference

in Search Preference you will see following Options 

  1. Meta tags
  2. Errors and redirections
  3. Crawlers and indexing
  4. Monetisation