Home » How to
Showing posts with label How to. Show all posts

October 25, 2020

How to Show widget only on homepage in blogger

1. Go to your www.blogger.com 

2. Select your blog in which you want to fix a value for the name field is required 

October 05, 2020

How to Add Fixed Responsive Floating AdSense Box In Your Blog Footer [Blogger]

Fixed Responsive Floating AdSense Box In Your Footer

These are the Steps by which you can use and  Add  Fixed Responsive Floating AdSense Box In your blogger footer Area.


1. Go to your www.blogger.com 
2. Select your blog in which you want to Open all Internal or External Links in New Tab
3. Click on Theme from Left Menu.
4. Click on Backup/Restore your template before doing any Changes.
5. Click on three dots (...) near my theme.
6. Click Any Where on the Code And Press (Ctrl + F) to find </head> tag in HTML.
7. Above the </head> paste the following CSS code.

September 25, 2020

Quick Step to Install Hotspot / OmniSD in Jio Phone | May 2020 | Download Online


Hey, Hello Every One! Have you been tried to Install OmniSD App in Jio Phone a lot, but you could not be able to install these Hotspot setting till now. Luckily you have come to the right place.  In this article I will tell you a complete installation guide for Jio Phone.


Quick Step to Install Hotspot / OmniSD in Jio Phone | May 2020 | Download File Online
Hey, Hello Every One! Have you been tried to Install OmniSD App in Jio Phone a lot, but you could not be able to install this Hotspot setting till now. Luckily you have come to the right place.  In this article I will tell you a complete installation guide for Jio Phone’s OmniSD / Hotspot.

Install Omnisd in Jio Phone [Before Jio Phone’s new update]
Installing Omnisd in Jio Phone Before Jio Phone’s new update was a little bit easy. There was not so much to do for installation. You have to install omnisd by Jio Phone’s Driver  using PC. You have to install Jio Phone’s PC Driver  in your Computer First.  After that one had to upload OmniSd File in Jio Phone to install and activate Hotspot to share internet for other devices. Now After Jio Phone’s new update (2020) , The whole story has been changed.

If you try to install Omnisd in Jio Phone after new update using older method , you will get some error like “Sahara fail”.  I made a long research for the solutions to install hotspot/omnisd in Jio Phone . After three months of continuous try  I found the solutions to How to install hotspot/Omnisd in Jio Phone wherever the new updates. Now my Jio Phone Hotspot working fine. I am currently using Lyf Phone’s Hotspot while I writing this post.

There some more additional setting you have to perform for Hotspot / OmniSD in Jio Phone. I will give complete method to install hotspot/omnisd step by step. You need not worry. I have done it easily in my Jio Phone (Model lyf f220b) successfully without any problem.

Now Let us Install Omnisd in Jio Phone [After Jio Phone’s new update]
As everyone knows here , After Jio Phone’s new update (LYF-F220B-001-02-34-170919) , OmniSd stop working on every LYF Jio Phones. Now cannot share internet After this update. I will show you here how you can install a OmniSD / Hotspot in your LYF Jio Phone.  To do this I choose a LYF Jio Phone ( F220B model )

What is OmniSD
“OmniSD is a third-party application for KaiOS, developed by Luxferre in August 2018, and like other applications it is written in HTML, JavaScript and CSS. ... It detects packaged applications in zip format present in the "downloads" or the "apps" folder of the sd card or the internal memory to then install them.

What is in the LYF Jio Phone
Jio Phone one of the budget 4 G mobile phone in India. It was launched in July 2017. It runs on KaiOS HTML5 based Firefox OS operating system. Jio Phone supports only Jio sim card. You cannot use any other’s network sim in this mobile phone. You will see many feature but no Hotspot/OmniSd. You can easily install Hotspot / OsmniSd feature in this phone.
LYF Jio Phone Detailed Specifications
Release date   July 2017
Battery capacity (mAh)     2000
Removable battery   Yes
Colours    Black

LYF Jio Phone Display
Screen size (inches)        2.40
Touchscreen    No
Resolution        240x320 pixels

LYF Jio Phone Hardware
Processor        1.2GHz dual-core
Processor make       Spreadtrum SC9820A (SPRD 9820A/QC8905)
RAM 512MB
Internal storage        4GB
Expandable storage Yes
Expandable storage type  microSD
Expandable storage up to (GB)        128

LYF Jio Phone Camera
Rear camera  =>      2-megapixel
Front camera =>      0.3-megapixel

LYF Jio Phone Software Information
Operating system     => KAI OS

LYF Jio Phone Connectivity
Hotspot  => No
Wi-Fi        =>Yes
GPS =>Yes
Bluetooth =>Yes, v 4.10
NFC =>    Yes
Infrared =>       No
Headphones =>        Yes
FM   => Yes
Number of SIMs =>  1
Wi-Fi Direct     =>No
Mobile High-Definition Link (MHL)    Yes
SIM Type  =>   Nano-SIM
GSM/CDMA  =>       GSM
3G   => No
4G/ LTE   =>Yes
Supports 4G in India (Band 40)          => Yes


Guide to Install Hotspot in Lyf Jio Phone [F220B]

Below are the three steps to Install OmniSd / Hotspot in Lyf Jio Phone
Step : 1. Downgrade the LYF Jio Phone.
Step : 2. Block Auto Update in Jio Phone.
Step : 3. Install OmniSd.
Step : 4. Install JGHotspot.

How to Downgrade the LYF Jio Phone ?
Requirements
To install hotspot in your LYF Jio Phone you need to downgrade your LYF Jio Phone first. Since the current Updated operating system is not supporting Omnisd application file.
Remove your Sim card from your Mobile phone.  Because while having Sim card in your Mobile phone , your phone starts downloading the latest updates automatically. So first we will install the hotspot in Jio Phone without sim.  Once it installs Omnisd / hotspot in the device without latest update, after block update the phone hotspot will work fine for ever without update.
Make sure your Mobile phone’s battery charged more than 50% . Installing Hotspot may consume more battery than normal in this process.
Backup of your device data, All device will be lost after flashing.

Guide to Downgrade the LYF Jio Phone ?

Block Auto Update in Jio Phone


August 20, 2020

How to display Legal Sticky Footer, Left & Right AdSense Ads in Blogger?

display Legal Sticky Footer, Left & Right AdSense Ads in Blogger


Hello Every One , Welcome to My Blog www.MohammadSuhail.Com

Having a google Adsense Account may be a typical task for you nowadays. But making money through google adsense may be more than it . If you are having google adsense Adsense account , you are lucky one. 

Many of them is complaining that they not making good amount of money in spite of applying Adsense ads in their Websites / Blog . 

In this post i will give you the best method by which you can make a decent money by applying the java script  widget code in your blog.

This code is legal. There will not be create any issue after using this code. These are the blog code in which you can insert your adsense ads code. You only have to put the code in blogger template layout area. The adsense ads will automatically display in thees blog codes. 

August 12, 2020

[Solved] How to fix breadcrumbs missing field "itemListElement" error

If you have got a message in your google search console message box and you are worrying about breadcrumb issue for your blog , you can easily fix this issue. 

August 08, 2020

10 Ways to Fix White/Blank Space Instead of AdSense ad on Your Website?

Displaying blank spaces instead of showing Adsense ads can be very annoying. It indicates that you are losing lost of revenue day by day until you find the appropriate solution.


10 Ways to Fix WhiteBlank Space Instead of AdSense ad on Your Website


Fortunately, this is not a big problem to solve. You can easily fix the issue by given method on this blog.

If you are continuously seeing the blank space instead of appearing adsense ads there may be the following reason.

June 03, 2020

[FeedBurner Fix] "The feed does not have subscriptions by email enabled"


If you get the FeedBurner error message like this, this means that you need to enable the subscription by email option from your FeedBurner account settings.

May 25, 2020

[Fixed] Blogger Favicon not Updating | Blogger Favicon Not Working


[Fixed] Blogger Favicon not Updating 

Favicon is a small icon file show in tab bar of the respective blog near your title.

You can upload your own Favicon image from the Layout tab in your Blogger Dashboard.

Uploading your Favicon

To upload your own Favicon image

Step 1. Go to Blogger www.blogger.com

Step 2. Select the blog in which you want to upload your own Favicon image

Step3. Go to ➟ Layout ➟ Click on Edit Option near Favicon.

Now Upload custom favicon

Note : Select a favicon file. Please use a square image that's less than 100 KB.

You Can Check you icon by following web address

http://[yourblog].blogspot.com/favicon.ico (Replace the blog name in the URL)


Easy Way to Remove Read More or Jump Break Link in Blogger

Hello Blogger Blogspot Guys, Do you not like Read More.. option in your blogger blogspot blog.   You are trying and want to remove Remove Read More... or Jump Break Link from your Blogspot . It is very easy to do so.

you might  face a problem while directly remove the read more link in default Blogger templates. Actually it does not remove after removing code. So In order to apply the style effects to such templates you need to remove the read more link provided by blogger Blogspot code.You can do it in few seconds. In this topic I will tell  you how to Remove Read More or Jump Break Link in Blogger Blogspot.

May 22, 2020

How to Configure JioFi/JioPhone with Tenda N300 | Tenda Universal Repeater

Hello Guys ,  If you are accessing internet using internet connection in old Laptop / PC or Desktop Computer by Tenda Router. You want to switch from cable internet connection /broadband connection to some wireless device like WiFi device(Jiofi /Airtel HotSpot) . but there is WiFi Connection is available in these devices . You need not worry . I will give you complete process to access internet in old Laptop / PC or Desktop Computer by Tenda Router from  WiFi device(Jiofi /Airtel HotSpot). You need to connect Tenda  Router as Universal Repeater mode. Then you will be able to access internet in Laptop / PC or Desktop.

Follow following steps to activate settings for Tenda Universal Repeater.

Type 192.168.0.1 in address bar of your browser and press Enter.


You will see the following window.

May 07, 2020

5 Simple Steps To Add Blogger Custom Domain With GoDaddy in 2020-21

First Go to www.blogger.com

Login into your Blogger Account ⇢ Go to your blog  Settings  Click on "Basic Visit "Publishing" Section 


Now Click on Set up a third-party URL for your blog    and type 'www.YourdomainName.Com' (you must use 'www' with your Domain Name)  ⇢ Click on Save Button


When you click on Save Button , you will get following Error

"We have not been able to verify your authority to this domain.


Add 'CNAME' records in GoDaddy

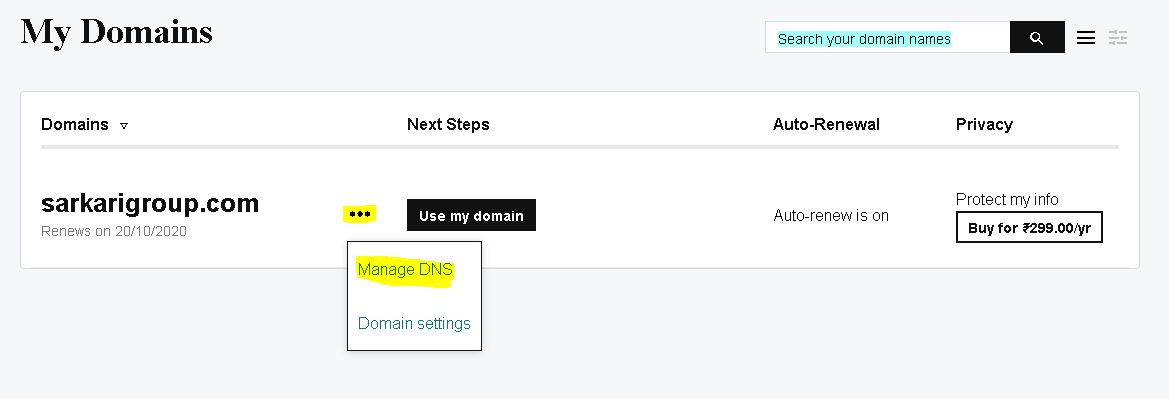
To add 'CNAME' records in GoDaddy , Login into your Godaddy account  click on 'Domains'  click 'All domains'  choose your domain  click on 'Manage' 


At the bottom side of the page  you will see the option for managing the DNS  Click on "Manage DNS"


Then the "Records" table will be popped out on the next page (Shown below). If there is already 'www' name is available then you need to edit it or if not, then you need to add a new record.


Click on "ADD"  In "Type" choose "CNAME"  in "Host" type "www"  and in "Points to" field type "ghs.google.com" as shown below;


Click on "ADD"  In "Type" choose "CNAME"  in "Host" type Second CNAME record  and in "Points to" field type the respective address. As shown below;


3. Setup 'A' zone records in GoDaddy.


Now its time to update the A zone records; i.e. IP addresses provided by the BlogSpot server. The process is the same as that of shown in the above steps; let's do it.


Here you need to add 4 IP addresses which are common for all the blogger users at the same record table shown above.


Click on "ADD"  In "Type" choose "A"  in "Host" type "@"  and in "Points to" field type "216.239.32.21" As shown below;


Again as same as above, including all add following 4 address;

216.239.32.21

216.239.34.21

216.239.36.21

216.239.38.21


This is how you can set the domain IP addresses that now pointing to your Blogger server addresses. The final CNAME & A record table will be like this;


4. Publish your Blogspot blog.


Once you completed all the above 3 steps, then its time to save all the settings and publish the blog.


Again go to the your blogger dashboard  Settings  Basic  "Publishing" section  check and SAVE it.


Make sure you check the option to redirect your "domainname.com" to "www.domainname.com"


The DNS settings which you made here (A & CNAME records) might take some time to generate. Now you required to wait for 1 to 4 hours for this changes to take effect globally.


Keep checking your custom domain should automatically redirect from the blogspot.com URL to your new custom domain name address.


That’s all for now; your BlogSpot blog address is has been set up with a custom domain name. Do let me know if you have any doubt in configuring a domain for your blog. In case you need some help, feel free to let me know via comment section shown below.