First Go to www.blogger.com
Login into your Blogger Account ⇢ Go to your blog ⇢ Settings ⇢ Click on "Basic" ⇢ Visit "Publishing" Section
Now Click on Set up a third-party URL for your blog ⇢ and type 'www.YourdomainName.Com' (you must use 'www' with your Domain Name) ⇢ Click on Save Button
When you click on Save Button , you will get following Error
"We have not been able to verify your authority to this domain."
Add 'CNAME' records in GoDaddy
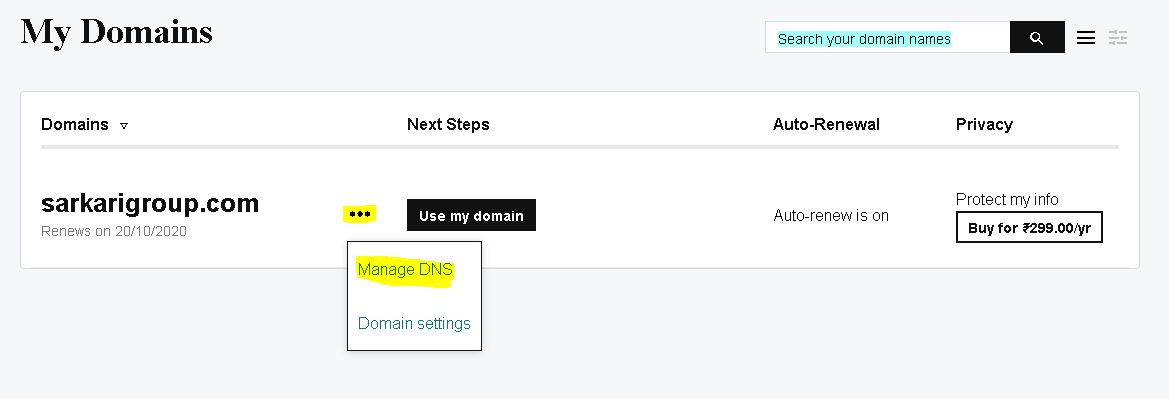
To add 'CNAME' records in GoDaddy , Login into your Godaddy account
⇢ click on 'Domains'
⇢ click 'All domains'
⇢ choose your domain
⇢ click on 'Manage'
⇢
At the bottom side of the page
⇢ you will see the option for managing the DNS
⇢ Click on "Manage DNS"

Then the "Records" table will be popped out on the next page (Shown below). If there is already 'www' name is available then you need to edit it or if not, then you need to add a new record.
Click on "ADD"
⇢ In "Type" choose "CNAME"
⇢ in "Host" type "www"
⇢ and in "Points to" field type "ghs.google.com" as shown below;
Click on "ADD"
⇢ In "Type" choose "CNAME"
⇢ in "Host" type Second CNAME record
⇢ and in "Points to" field type the respective address. As shown below;
3. Setup 'A' zone records in GoDaddy.
Now its time to update the A zone records; i.e. IP addresses provided by the BlogSpot server. The process is the same as that of shown in the above steps; let's do it.
Here you need to add 4 IP addresses which are common for all the blogger users at the same record table shown above.
Click on "ADD"
⇢ In "Type" choose "A"
⇢ in "Host" type "@"
⇢ and in "Points to" field type "216.239.32.21" As shown below;
Again as same as above, including all add following 4 address;
216.239.32.21
216.239.34.21
216.239.36.21
216.239.38.21
This is how you can set the domain IP addresses that now pointing to your Blogger server addresses. The final CNAME & A record table will be like this;
4. Publish your Blogspot blog.
Once you completed all the above 3 steps, then its time to save all the settings and publish the blog.
Again go to the your blogger dashboard
⇢ Settings
⇢ Basic
⇢ "Publishing" section
⇢ check and SAVE it.
Make sure you check the option to redirect your "domainname.com" to "www.domainname.com"

The DNS settings which you made here (A & CNAME records) might take some time to generate. Now you required to wait for 1 to 4 hours for this changes to take effect globally.
Keep checking your custom domain should automatically redirect from the blogspot.com URL to your new custom domain name address.
That’s all for now; your BlogSpot blog address is has been set up with a custom domain name. Do let me know if you have any doubt in configuring a domain for your blog. In case you need some help, feel free to let me know via comment section shown below.